Saturday, 17 November 2012

papier mache necklaces etc

A selection of necklaces, pendants, bracelets, bangles and earrings that I have been making recently. I am so enjoying making  papier mache beads and pushing the boundaries of papier mache. The papers I am using are Tyvek paper and iridescent tissue, both of which I heat shrink rather than glue together. I also have used air dried papier mache clay that I paint with acrylic inks and coat with matte acrylic varnish and/or epoxy resin and added Japanese seed and bugle beads that are silver lined and that I encourage to oxidize to add a certain aged quality that is in sympathy with the fragments of 17th century clay pipes that you will see in some of the pieces. I thread the beads onto Beadalon 7 strand nylon coated stainless steel wire. I use silver plated clasps on my pieces as I am putting the value into creativity rather than precious metals but will use Sterling Silver when requested.
Iridescent papier mache + matte papier mache paste beads + Japanese silver lined glass beads. I like to let the silver lining oxidize so that it echoes the necklaces that I find so inspiring in the Etruscan and Greek rooms in the British Museum.


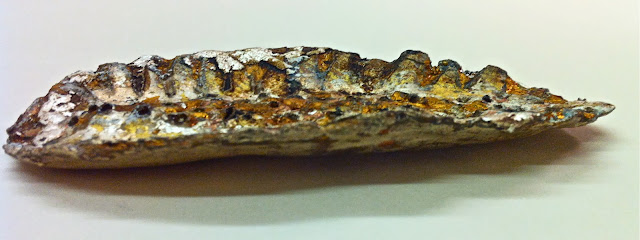
Double stranded necklace with fragments of river washed 17th century clay pipes from the River Thames. The original colour of clay pipes was off white. Some fragments have become discoloured over time by absorbing the beautiful blue/grey clay river silt or ochres from lying next to rusting metal - rusty nails from the hulls of old wooden boats etc.


The above necklace was made to remind me of  wonderful necklace I saw in Burlington Arcade in London made from large and irregular shaped fresh water Baroque pearls. I heat shrink Tyvek paper and iridescent tissue and then either dip them in resin or paint them with gloss varnish. They also look really good when they have a coat of matte varnish on or a mix of the two.
Source: Uploaded by user via Hilary on Pinterest


I flattened some of the beads just after heat shrinking the Tyvek paper and the painted them with French sepia ink and then heat shrunk some layers of iridescent tissue, bringing out the greens, golds and bronzes.


Necklace using iridescent and squeezed papier mache beads.


brooch


pendant


Monday, 3 September 2012

Video tutorials 1 - 17b

Follow my blog with Bloglovin
My cover image is one that I have enhanced on iphoto. I took the original photograph in Pompeii. It was a detail from a fresco of a hunting scene - very very beautiful but naturally dull and faded after all its eventful history. 
I wanted to take it back to how it might  have looked when new. An impossible venture really - perhaps - but instead it just became more and more interesting as I heightened the colours, added contrast and definition. And what is more, it became very much in-line with what I try to create in my own work - erosion, cracks, shifts of light and colours - all conveying a sense of history and telling a story. 
Then I rotated the image to make the deer appear to be leaping over a precipice and throwing all caution to the winds to escape her hunter. I think that many of us can resonate with that. She escapes, she is a survivor and she is here today to inspire us all. I am very, very fond of her.
BBC film of my work made in the 1990's

Intro to new tutorials - series 1

part 1 - The start of making pendants and brooches etc using epoxy moulding paste - Siligum to make impressions from seed heads - bottlebrush, magnolia, fir, poppy etc plus found obects - old beer bottle cap, barnacled stones etc. Taking impressions with air dried papier mache. Using acrylic gold size. Using modroc to make pendant bases.
Some finished pieces -


part 2 - Building up stock - tray of impressions made from a poppy seed head and base of a fir-cone, using Siligum and air dried papier mache. Painting bottlebrush impression with sepia ink. Adding more acrylic gold size and metal leaf.

part 3 - Building up layers by adding modroc to decorate and strengthen the backs of some fir-cone impressions. Adding gold leaf onto acrylic gold size. Making impressions of/for little fir-cone earrings.

part 4 - Adding modroc to magnolia seed head impressions. Taking the curved seed head pendant to the next level by adding gold leaf. Making tissue paper discs and cones.

part 5 - Making simple tissue paper and P.V.A squares to use later. Making simple rolled pendant bails/beads. Making 'squeezed' beads.

part 6 - Tyvek and iridescent beads made with the aid of a heat gun. Update on squeezed beads, poppy head, little end of fir-cone base earrings and squashed beer cap impressions.

part 7 - Using epoxy resin.

part 8 - Up-date on tissue 'flowers' - squeezed beads with iridescent tissue, painted with resin, with Daler-Rowney Shimmering Blue. Adding sepia ink to the iridescent tissue before heating/shrinking. Ideas for decorating squeezed beads. Big circular brooch - stage 1.


part 9 - My aim is to encourage anyone to be able to make beautiful jewellery from easily found materials, often those that are recycled - plastic milk bottles - discs, square and clear glass bugle and seed beads. Extra tissue and P.V.A backing for 'flowers' - tip - wooden kebab stick through a drinking straw. Making delicate flowers with eye pins, layered tissue squares + 3D glue. Ideas for earrings/components for pins, necklaces, bracelets etc.

part 10 - brief glimpse of nearly finished papier mache bowl. More ideas using empty plastic milk bottles and little squares of torn layered tissue paper and P.V.A glue threaded on wire. Sequence - milk bottle plastic square, seed bead, torn tissue square, seed bead, repeat a few times, then seed bead, bugle bead, tyvek bead and repeat. Plastic milk bottle handle cut into 0.5cm widths and pierced also works well. Caution about pyrography tool. Open windows/doors. It works beautifully on air dried papier mache, tissue paper/P.V.A glue. Work on ceramic tile and UNPLUG after using! Poking into bottlebrush seed head to deepen indentations.

part 11 - Strengthening 'flower' discs without losing transparency with tissue and P.V.A/water. Squeezed beads - Daler-Rowney System 3 white acrylic, Sundown Magenta - pearlescent, Marine Blue - F.W mixed. Using silver foil independently and under transparent acrylic inks. Fraying modroc to add to back of conical pieces (made from tissue and air dried papier mache)

A little diversion - Introducing Emmy the hen.

A little diversion - Beach-combing in Salcombe - a collection of found bits and bobs to use in the future.

part 12 - an update.

part 13 - Making rings with Modroc and air dried papier mache on tube wrapped with Cling Film. Using magnolia epoxy mould to make additions to rings etc.

Treasures from the River Thames - finds from beach-combing at low tide.

Back in the studio in Devon

part 14 - papier mache 'flowers' etc - next step
Papier mache 'flowers' - adding Liquitex Acylic Gesso. Resin on iridescent tissue (heat shrunk) beads. Burning 'flowers' with a pyrography tool. Deepening bottle brush seed head with pyrography tool.

part 14a - some more ideas on making paper 'flowers' - made from tissue paper and p.v.a glue/water mix, air dried papier mache clay, modroc - curved ones with petals, formed on the top of an old light bulb or inflated balloon.


Part 15 - Finished necklaces using Tyvek + iridescent tissue (heat shrunk), glass beads and squeeze formed air dried papier mache clay, fragments of clay pipes from Mud-larking on The River Thames. Making a mould with Siligum epoxy moulding paste to take an impression from beach pebbles to make an air dried papier mache clay necklace. The bottle brush pendant - nearly finished + bottle brush ring. Milliput epoxy moulding paste to add to the Modrock/air dried papier mache clay bangle.

Part 16a - A more indepth tutorial on making iridescent or fantasy film beads for jewellery. NB - These processes must be done with excellent ventilation. Work outside or with a good through draft - open windows and doors, use a fan to move the air away from you.

Part 16b - Always work with excellent ventilation!


Part 16c - Adding some colour variations to the iridescent tissue with acrylic inks, water colour and a black acrylic paint with glittery bits in it.


Series 1 - part 17 - making a papier mache bowl with Modroc etc.

Series 1 - part 17a - adding a foot to the basic Modroc bowl.

Series 1 - part 17b - modrock and air dried papier mache bowl.


Monday, 27 August 2012

Paris

Paris - city of inspiration, memories and friends.


Source: 9gag.com via Hilary on Pinterest

Source: tumblr.com via Hilary on Pinterest

Source: easyart.com via Hilary on Pinterest


Source: google.com via Hilary on Pinterest

Source: tumblr.com via Hilary on Pinterest


Source: flickr.com via Hilary on Pinterest


Source: tumblr.com via Hilary on Pinterest

Source: google.com via Sarah on Pinterest

Source: google.com via Sarah on Pinterest


Related Posts Plugin for WordPress, Blogger...